|
"To see we must forget the name of the thing we are looking at." Claude Monet
Saving Images for the Web
© 2002 Nita Leland
On the web there are many opportunities to share your images. For most people this means family photos or vacation pictures. For artists it means putting artwork up for display, sale, or critique by other artists. I frequently receive requests from artists to review their work or visit their web sites. I'm happy to do this, but if their images aren't properly prepared for the web, I simply don't have time to sit and wait for unoptimized scanned images or digital photos to load. Some unoptimized images may be more than 2-12 MB in size! Such images require scrolling to view. You can't make sense of a painting or drawing if you can't see the entire piece on the screen.
There are dozens of image-optimizing programs. I've worked with several simple, inexpensive programs that are easy to use (ArcSoft Photostudio, MGI PhotoSuite, Photoshop Elements, to name a few), as well as with Photoshop, at the high end. My favorite is Photoshop Elements ($99), which gives me lots of image-editing options, as well as the capability of quickly resizing for the web. I'm not a digital wizard by any means, but I've learned through trial-and-error how to optimize my images for the web so they are viewable in their entirety and still show enough detail to give a good representation of the artwork.
I hope this step-by-step explanation of the process will help you put better, smaller images on your web site or in your emails.
- Start your image-editing program and open your scanned or digital photo in the program.
- Save the image as a .tif uncompressed image. Do NOT edit this .tif image. It holds all the digital information from the original scan or photo and can be used if you have to start over.
- Re-open the original scanned image or digital photo, not the .tif file. This file may be a .jpg or a .bmp, depending on how you set your scanner or camera to save images.
- If necessary, crop and edit the image for brightness, contrast or color.
- Resize or resample the image to 72 pixels-per-inch, the standard for web images.
- Set the width to 300 pixels for vertical images, 400 pixels for horizontals. Most programs will set the other dimension automatically (constrain proportions).
- When all the editing and resizing is done, sharpen the image if necessary. (Use Unsharp Image in Photoshop Elements, starting with 100%.) Don't sharpen too much or the image will look "sparkly."
- Save the image as a .jpg. The .jpg file will be compressed, which means that similar pixels will be combined so the file is reduced in size. This compression takes place every time you save a .jpg file, so don't resave too often or you'll degrade the image. You can experiment with "quality" settings. I use low-medium for a single image and low for several images on a page.
- Once you have your image prepared for the web, don't enlarge or reduce it on your web page. Put the same dimensions in your html code as you saved the file in. It will pixellate (show the pixels) if you enlarge it; and if you reduce it, it may look okay, but will not reduce the size of the file as you originally saved it.
 |
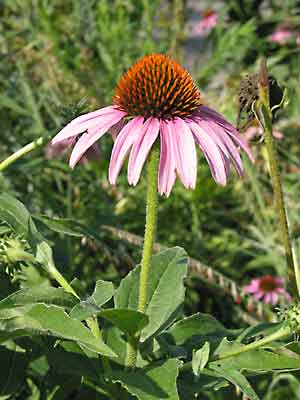 |
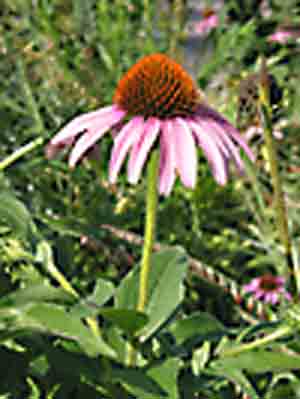
Some image-editing programs allow you to "Save for Web" or email. They optimize the images automatically after you edit the picture. The picture on the left was edited and saved manually at a low setting (42+K). The one on the right was optimized and Saved for Web (15K). Either one is acceptable for web viewing or email, but the smaller one will load faster.
This image was downsized to a smaller size, edited and saved, then resized to a larger size and resaved. Once the pixels are lost in a downsizing, they can never be recovered. If this happens, go back to the .tif file you saved and start over.
|